The Lab Data section at the bottom of the page shows the original values from the lab. These values cannot be changed. The Errors/Warnings section shows the current status of the lab sample result.
Updating a lab sample
 Note: You can only edit lab sample results if their status is Not Processed and they have no errors. Once a sample is processed, it cannot be edited.
To update or edit an unprocessed lab sample result from the Lab Search page: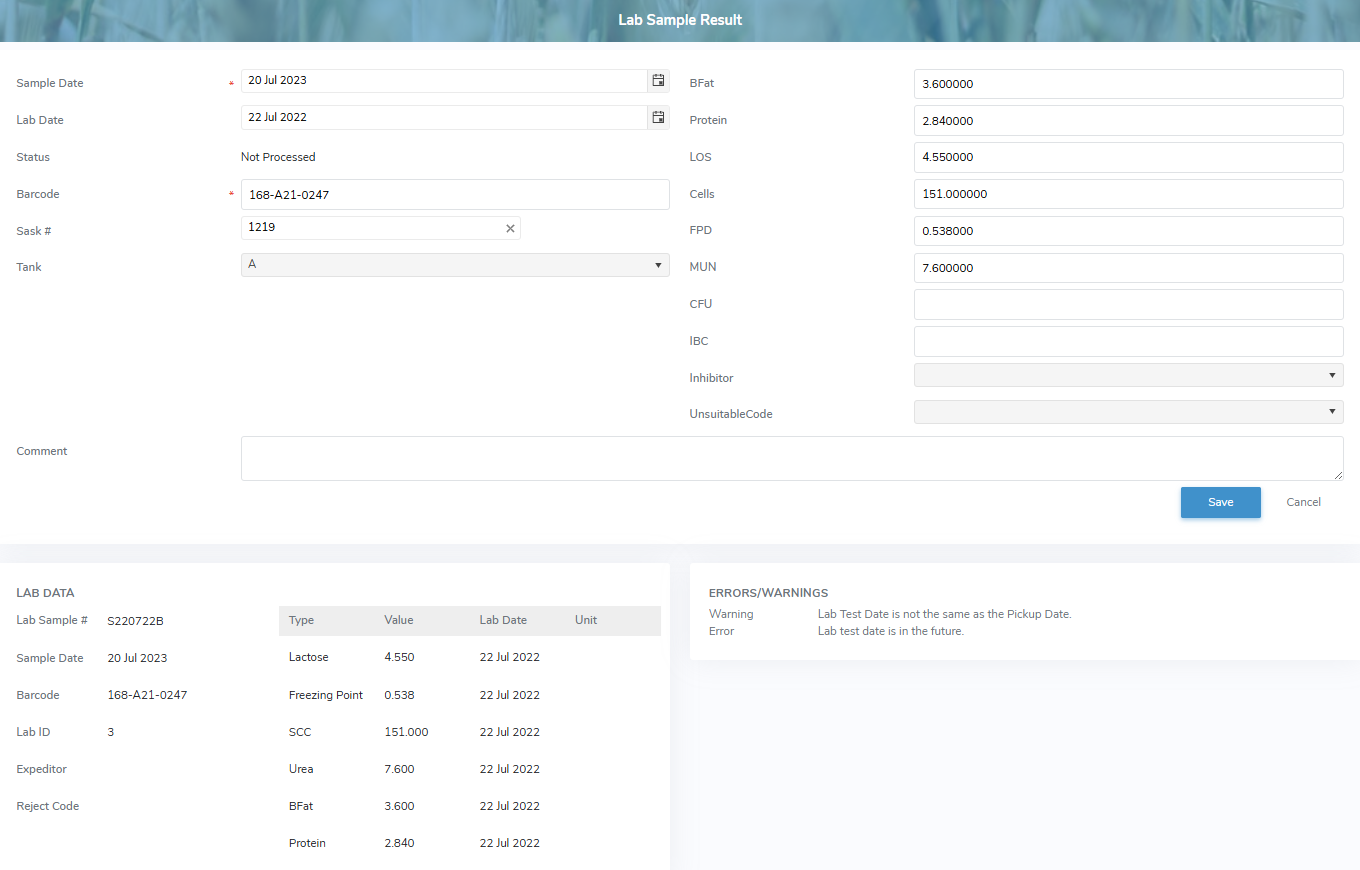
1)Click Edit icon to open the Lab Sample Result page.
2)Update the details of the unprocessed lab sample result as needed:
•Sample Date*: Type the date or click the Calendar icon to select the sample date.
•Lab Date: Type the date or click the Calendar icon to select the lab date.
•Status: Not editable. Displays the current status of the record.
•Barcode: Type the full barcode of the lab test.
•Sask #: Type partial or full number of producer, and then use the scroll bar to move up or down to find and select the desired producer.
•Tank: Click the arrow and select the tank number of the selected producer.
Components
•BFat: Type the measure/value of the butter fat content.
•Protein: Type the measure/value of the protein content.
•LOS: Type the measure/value of lactose & other solids.
•Comment: Type a comment for the lab sample result, if applicable.
Quality
•Cells: Type the measure/value of Somatic cell count.
•FPD: Type the measure/value of the Freezing Point Depression.
•MUN: Type the measure/value of the Milk Urea Nitrogen content.
•CFU: Type the measure/value of the Colony forming unit.
•IBC: Type the measure/value of the Individual Bacteria Count.
•Inhibitor: Click the arrow and select whether the presence of an inhibitor is positive or negative.
•UnsuitableCode: Click the arrow, and then use the scroll bar to move up or down to find and select the desired unsuitable code for the lab sample.
Note: To view the current list of suitability codes go to Admin > Manage Settings > Code Tables and select Lab Test Unsuitable Reason Code.
3)Click Save to save the changes and return to the Lab Sample Result page. The errors/warnings messages are updated and you can continue to edit the unprocessed lab sample or Click Return to return to the Lab Search page.
– or –
Click Cancel to return to the Lab Search page without saving the details.
Adding a comment to one or more lab samples
To add a comment to one or more unprocessed lab samples from the Lab Search page:
1)Select the lab sample row(s) you want to add a comment to. The row selected is highlighted in blue.
 Tip: To select multiple lab samples, click the first one, then hold down CTRL button while clicking the others you want.
2)Click the vertical ellipsis icon ( ) in the top right corner of the Lab Samples table, and then click Add Comment to display the Add Comment dialogue.
3)Type a comment that is applicable to the lab test(s). The maximum limit is 2,000 characters.
4)Click Save to save the changes and return to the Lab Search page.
– or –
Click Cancel to return to the Lab Search page without saving changes.
Updating a sample date to one or more lab samples
Note: You can only edit lab sample results if their status is Not Processed and they have no errors. Once a sample is processed, it cannot be edited.
To update the sample date of one or more unprocessed lab samples from the Lab Search page:
1)Select the lab sample row(s) you want to update. The row selected is highlighted in blue.
Tip: To select multiple lab samples, click the first one, then hold down CTRL button while clicking the others you want.
2)Click the vertical ellipsis icon () in the top right corner of the Lab Samples table, and then click Update Sample Date to display the Update Sample Date dialogue.
3)Type a date or click Calendar icon to select date to apply to the lab samples.
4)Click Save to save the changes and return to the Lab Search page.
– or –
Click Cancel to return without saving changes.
Processing one or more lab samples
Note: You can only process lab sample results if their status is Not Processed and they have no errors. Once a sample is processed, it cannot be edited.
To process one or more lab samples so the results appear within the Milk Portal and overwrite the existing data values:
1)Select the lab sample row(s) you want to process. The row selected is highlighted in blue.
Tip: To select multiple lab samples, click the first one, then hold down CTRL button while clicking the others you want.
2)Click the vertical ellipsis icon () in the top right corner of the Lab Samples table, and then click Process Samples to display a message asking if you want to process these samples.
3)Click OK to confirm you want to process the sample. The lab samples and its detailed information overwrite the existing data values and display on the Lab Search page.
 Warning: After a lab sample has been processed it cannot be changed. Use this process with caution.